Secure AWS deploys from GitHub Actions with OIDC
Long gone are the days when you had to keep long-lived access keys in your CI/CD pipelines to deploy to AWS. Learn how to use OIDC (OpenID Connect) to securely deploy to AWS from Github Actions, and how to use GitHub Environments to secure deployments to specific AWS environments.
Introduction
Managing access from your CI/CD systems to your cloud environments in a secure manner can often be a tedious challenge. For a long time, one common way to do so for AWS was to set up an IAM user for this purpose and then store the access keys for that user in e.g. GitHub secrets for use with GitHub Actions. This required a lot of manual work, such as setting up different users for different projects, rotating keys after a certain period, etc.
By utilizing OIDC you can configure AWS to trust GitHub as a federated identity provider, and then use ID tokens in Github Actions workflows to authenticate to AWS and access resources. You can create separate IAM roles for different purposes and allow workflows to assume those roles in a granular way.
Each job in a GitHub Actions workflow can request an OIDC token from GitHub’s OIDC provider. The contents of the token are described well in the GitHub documentation. Depending on the job’s configuration, as well as what event triggered the workflow, the token will contain a different set of claims. One important claim is the sub claim, which will be used in our IAM Role trust policies to grant permission for workflows to use a role.
For example, if a workflow is triggered by a push to the main branch of a repository named repo-org/repo-name, the subject claim will be set to repo:repo-org/repo-name:ref:refs/heads/main. If a job references a GitHub environment named Production, the subject claim will be set to repo:repo-org/repo-name:environment:Production.
For a full list of possible subject claims, check the GitHub documentation.
Example setup
In this example, we will use two different S3 buckets to mimic two different AWS environments. We will create two different workflows, one that will be triggered by pushes to the main branch, and another that will be triggered by pull requests.
On pull requests, we want to be able to read our environments. In a real example, this could perhaps be a terraform plan job that could visualize any proposed changes to the environment. We will also deploy to the development environment from pull requests, to speed up the feedback loop. We do, however, NOT want to deploy to the production environment from pull requests. We also need to make sure that contributors cannot update the workflow as part of the pull request to include a deployment to the production environment.
For pushes to main, we want to be able to read and deploy to both environments. We will also require manual approval from a repository admin to deploy to the production environment.
In the example workflows, read and deploy operations will be demonstrated by download and upload operations to the respective S3 buckets.
1. Create buckets
Start by creating two buckets in your account. I will refer to these below as YOUR_DEV_BUCKET and YOUR_PROD_BUCKET.
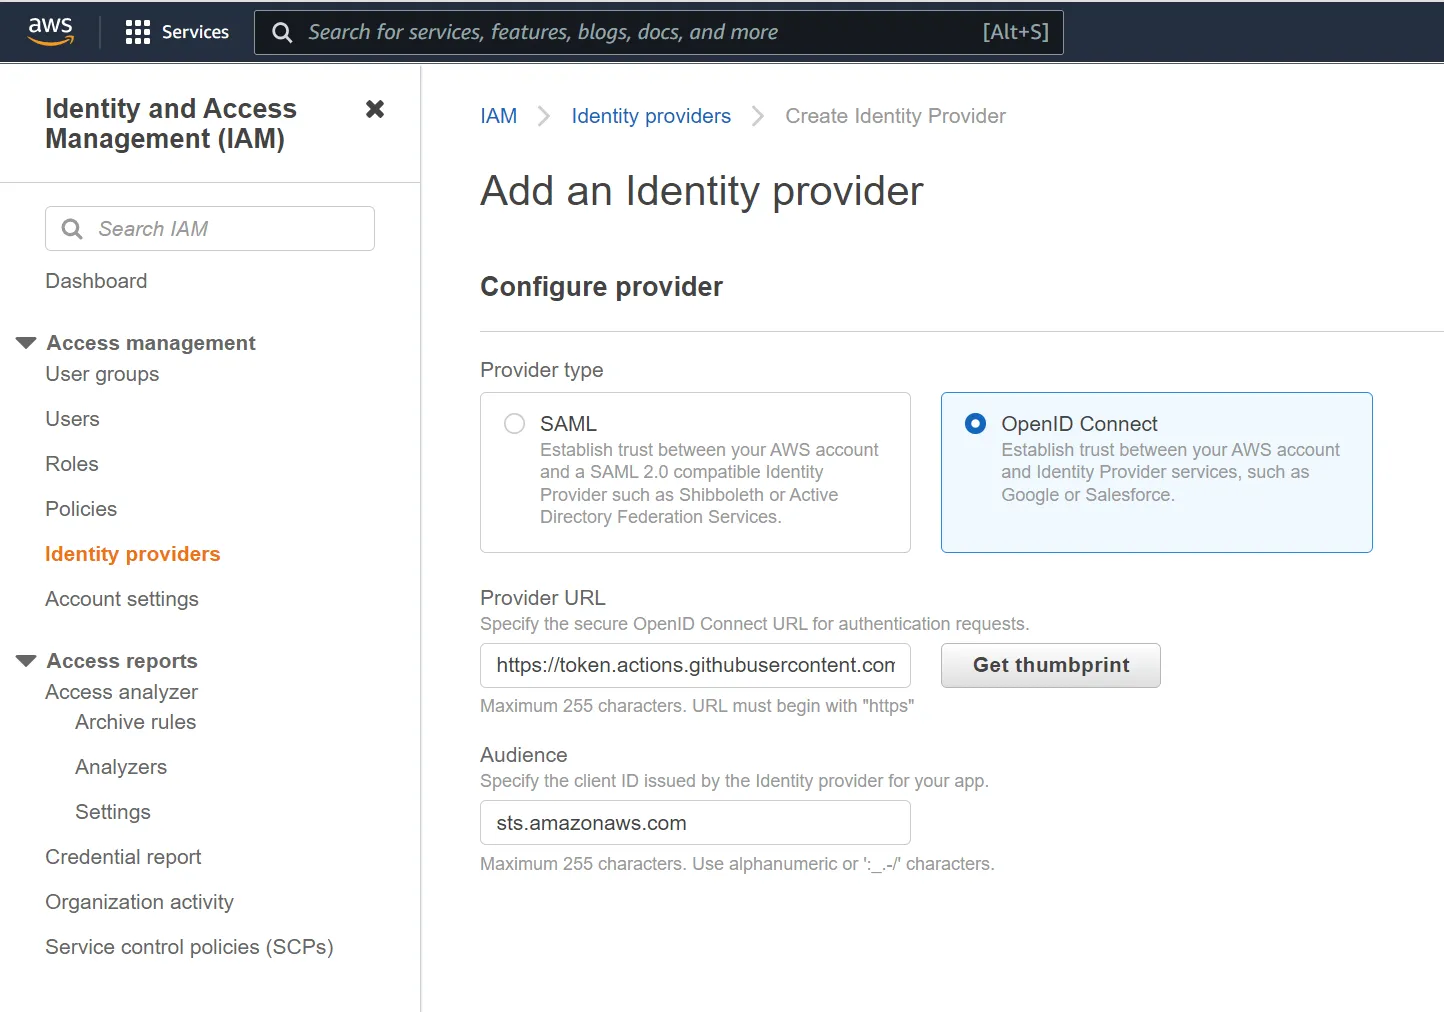
2. Add GitHub as an identity provider
To be able to authenticate with OIDC from GitHub you will first need to set up GitHub as a federated identity provider in your AWS account. To do that, navigate to the AWS IAM console and click on Identity Providers on the left-hand side. Then, click on the Add provider button.
- For Provider type, select OpenID Connect.
- For Provider URL, enter
https://token.actions.githubusercontent.com - Click on Get thumbprint to get the thumbprint of the provider
- For Audience, enter
sts.amazonaws.com
3. Create roles and policies
Now that GitHub is set up as an identity provider, it is time to create the roles and policies that will be assumed by the respective workflows. You will create three roles:
- Reader role: Will have read permissions on both the buckets. This role will be available both for
pull_requestevents as well aspushevents to themainbranch. - Dev Deploy role: Will have both read and write permissions to the
devbucket. This role will require a workflow to use theDevelopmentGitHub environment. - Prod Deploy role: Will have both read and write permissions to the
prodbucket. This role will require a workflow to use theProductionGitHub environment.
Reader role
Start by creating a new role that will be used to read from the buckets. The role should be able to be assumed by both workflows triggered by the pull_request and push events. To allow this, the role will need to have the following trust policy:
{ "Version": "2012-10-17", "Statement": [ { "Effect": "Allow", "Principal": { "Federated": "arn:aws:iam::0123456789:oidc-provider/token.actions.githubusercontent.com" }, "Action": "sts:AssumeRoleWithWebIdentity", "Condition": { "StringEquals": { "token.actions.githubusercontent.com:sub": [ "repo:ORG_OR_USER_NAME/REPOSITORY:pull_request", "repo:ORG_OR_USER_NAME/REPOSITORY:ref:refs/heads/main" ], "token.actions.githubusercontent.com:aud": "sts.amazonaws.com" } } } ]}You need to replace the ORG_OR_USER_NAME and REPOSITORY with your own values. For my example repository eliasbrange/aws-github-actions-oidc it would be "repo:eliasbrange/aws-github-actions-oidc:pull_request"
Next, add an IAM policy to this role that grants the role permission to read from the buckets.
{ "Statement": [ { "Action": ["s3:ListBucket"], "Effect": "Allow", "Resource": [ "arn:aws:s3:::YOUR_DEV_BUCKET", "arn:aws:s3:::YOUR_PROD_BUCKET" ] }, { "Action": ["s3:GetObject"], "Effect": "Allow", "Resource": [ "arn:aws:s3:::YOUR_DEV_BUCKET/*", "arn:aws:s3:::YOUR_PROD_BUCKET/*" ] } ], "Version": "2012-10-17"}Development Deploy Role
Create another role that will be used to “deploy” to the development environment, in this case by uploading a file to the development bucket. This role should require the workflow to use a GitHub Environment named Development, so it will require the following trust policy:
{ "Version": "2012-10-17", "Statement": [ { "Effect": "Allow", "Principal": { "Federated": "arn:aws:iam::0123456789:oidc-provider/token.actions.githubusercontent.com" }, "Action": "sts:AssumeRoleWithWebIdentity", "Condition": { "StringEquals": { "token.actions.githubusercontent.com:sub": "repo:ORG_OR_USER_NAME/REPOSITORY:environment:Development", "token.actions.githubusercontent.com:aud": "sts.amazonaws.com" } } } ]}Give it the following IAM policy:
{ "Statement": [ { "Action": ["s3:ListBucket"], "Effect": "Allow", "Resource": ["arn:aws:s3:::YOUR_DEV_BUCKET"] }, { "Action": ["s3:GetObject", "s3:PutObject"], "Effect": "Allow", "Resource": ["arn:aws:s3:::YOUR_DEV_BUCKET/*"] } ], "Version": "2012-10-17"}Production Deploy Role
Create the final role, which will be used for production deploys. It should look similar to the development role, but with some changes to the permissions.
Add the following trust policy:
{ "Version": "2012-10-17", "Statement": [ { "Effect": "Allow", "Principal": { "Federated": "arn:aws:iam::0123456789:oidc-provider/token.actions.githubusercontent.com" }, "Action": "sts:AssumeRoleWithWebIdentity", "Condition": { "StringEquals": { "token.actions.githubusercontent.com:sub": "repo:ORG_OR_USER_NAME/REPOSITORY:environment:Production", "token.actions.githubusercontent.com:aud": "sts.amazonaws.com" } } } ]}Give it the following IAM policy:
{ "Statement": [ { "Action": ["s3:ListBucket"], "Effect": "Allow", "Resource": ["arn:aws:s3:::YOUR_PROD_BUCKET"] }, { "Action": ["s3:GetObject", "s3:PutObject"], "Effect": "Allow", "Resource": ["arn:aws:s3:::YOUR_PROD_BUCKET/*"] } ], "Version": "2012-10-17"}4. Create GitHub Environments
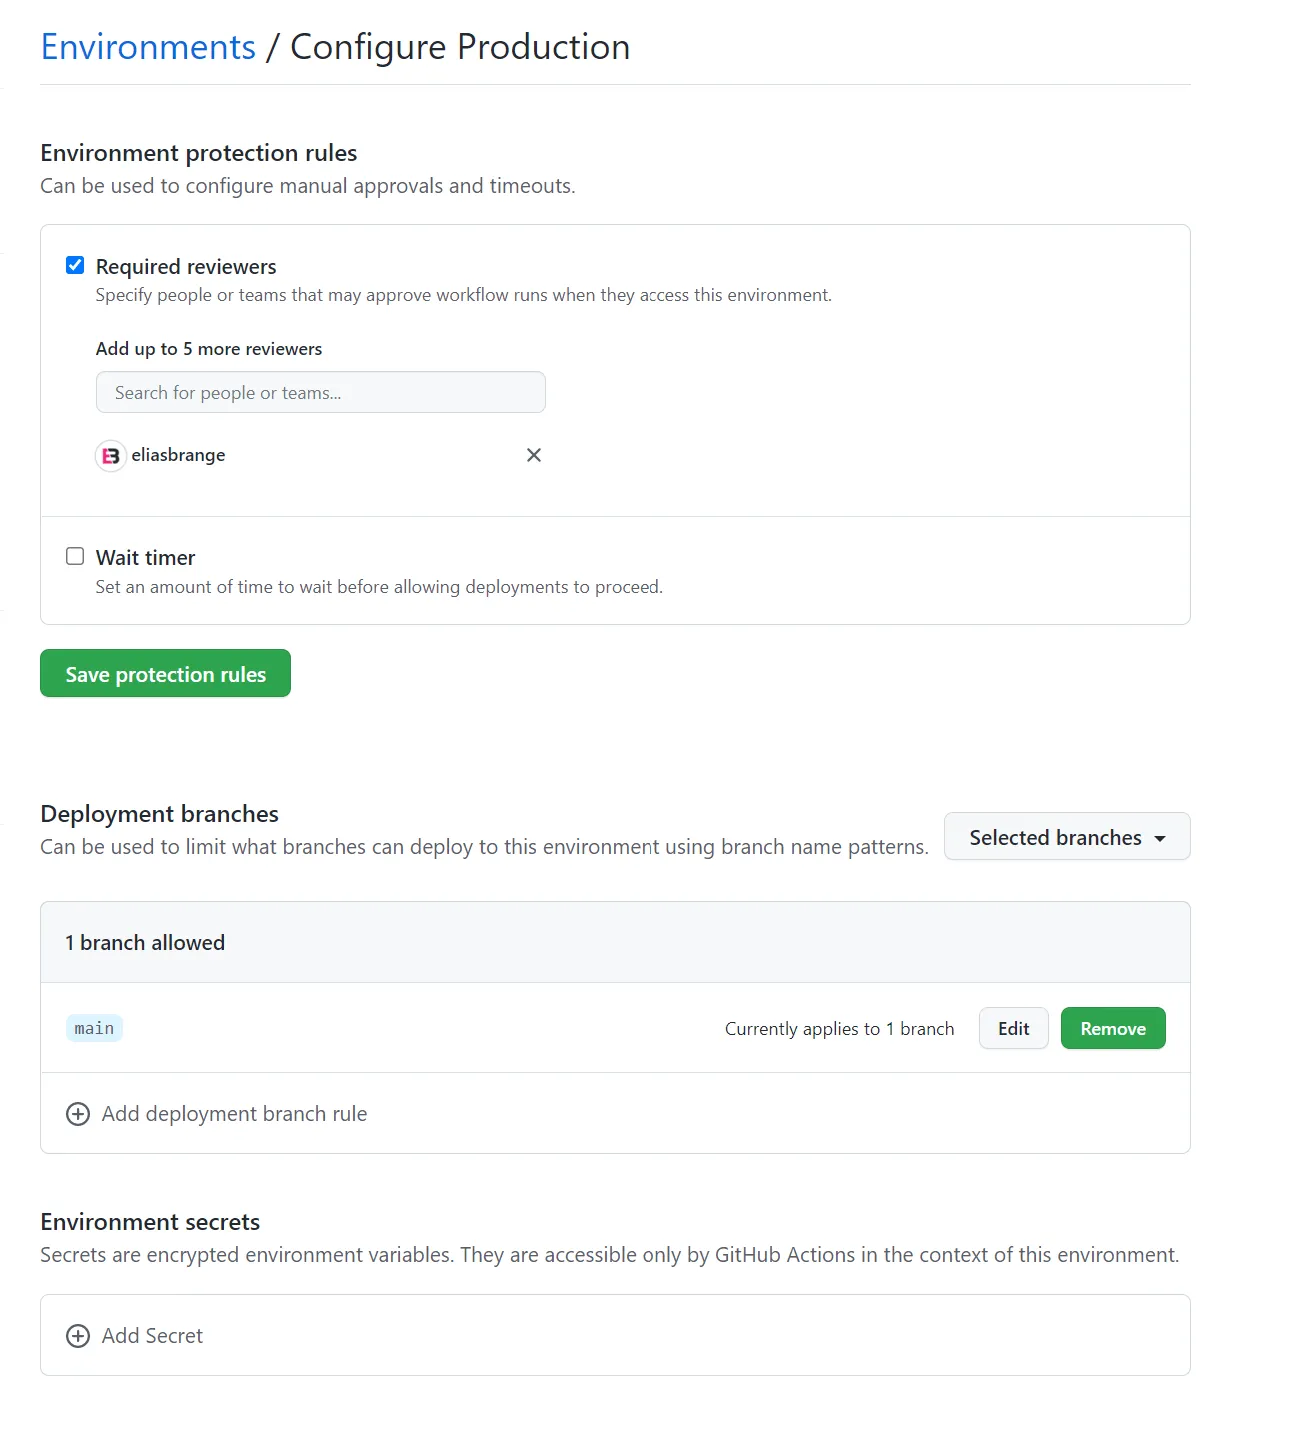
In your GitHub repository, create two environments, Development and Production. For Development, we will not add any safeguards so that we can deploy to it directly from pull requests. However, for the Production environment, we will add a few protection rules.
- In the environment configuration under Environment protection rules, tick the Required reviewers box and add your own GitHub username.
- In the environment configuration under Deployment branches, pick Selected branches in the dropdown and add
mainas an allowed branch.
The above rules will prevent contributors to modify the actual workflow as part of a pull request to deploy to production. It will also force workflows that target the Production environment to require manual approval.
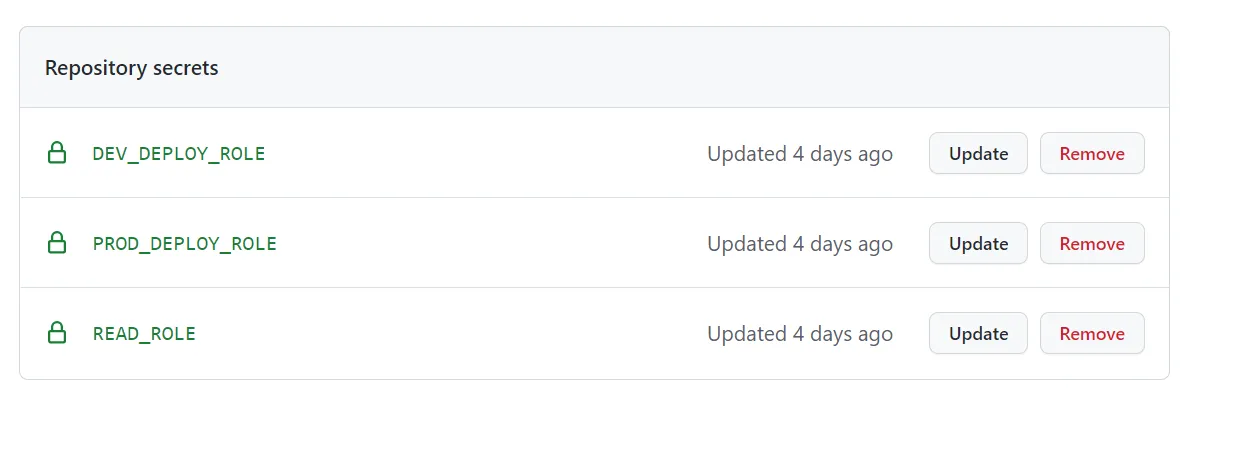
5. Add GitHub secrets
Note
While you could use secrets scoped to each environment, I want to show that even if the workflow has access to the secret, it will not be able to assume roles it shouldn’t have access to.
In your GitHub repository, add the following secrets:
DEV_DEPLOY_ROLE: The ARN of your development deploy role.PROD_DEPLOY_ROLE: The ARN of your production deploy role.READ_ROLE: The ARN of your reader role.
6. Create workflows
Time to create the deployment workflows. You will create a total of three workflows, one for pull requests, one for pushes to main, as well as a bonus workflow for visualizing which workflow event triggers that has access to which IAM roles.
Note
The workflows will both try to download a file named README.md from your
buckets, as well as upload a file from the repository root named README.md
to the buckets. Either change the workflows to use another file or make sure
that you have a README.md file in your repository root. To allow the first
run of the workflows to succeed, you also need to upload said file to both
buckets.
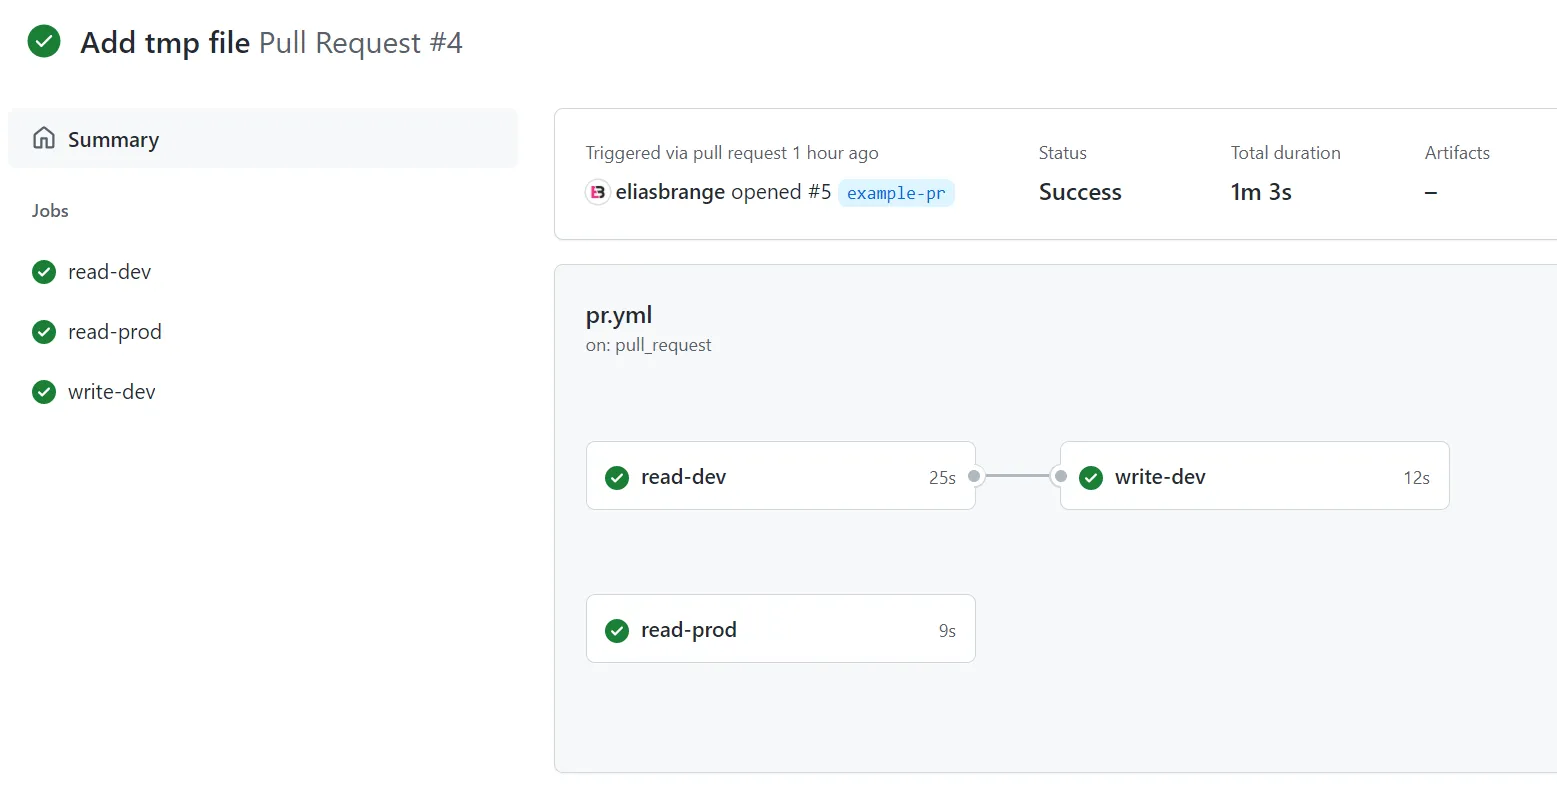
Pull request workflow
Add the following workflow to your repository:
name: 'Pull Request'
# The workflow should only trigger on pull requests to the main branchon: pull_request: branches: - main
# Required to get the ID Token that will be used for OIDCpermissions: id-token: write
jobs: read-dev: runs-on: ubuntu-latest steps: - name: Checkout uses: actions/checkout@v3
- name: Configure AWS Credentials uses: aws-actions/configure-aws-credentials@v1 with: aws-region: eu-west-1 role-to-assume: ${{ secrets.READ_ROLE }} role-session-name: OIDCSession
- run: aws s3 cp s3://YOUR_DEV_BUCKET/README.md README.md shell: bash
write-dev: runs-on: ubuntu-latest needs: read-dev environment: Development steps: - name: Checkout uses: actions/checkout@v3
- name: Configure AWS Credentials uses: aws-actions/configure-aws-credentials@v1 with: aws-region: eu-west-1 role-to-assume: ${{ secrets.DEV_DEPLOY_ROLE }} role-session-name: OIDCSession
- run: aws s3 cp README.md s3://YOUR_DEV_BUCKET/README.md shell: bash
read-prod: runs-on: ubuntu-latest steps: - name: Checkout uses: actions/checkout@v3
- name: Configure AWS Credentials uses: aws-actions/configure-aws-credentials@v1 with: aws-region: eu-west-1 role-to-assume: ${{ secrets.READ_ROLE }} role-session-name: OIDCSession
- run: aws s3 cp s3://YOUR_PROD_BUCKET/README.md README.md shell: bashThis is a very basic workflow that:
- First downloads the
README.mdfile from theDevelopmentbucket. - Then uploads the
README.mdfrom the repository to theDevelopmentbucket. - Finally downloads the
README.mdfile from theProductionbucket.
Not a very exciting, nor useful, workflow, but it demonstrates the usage of different roles and environments.
In both read-dev and read-prod there is no environment specified, so the ID token in these jobs will have a subject claim of repo:ORG_OR_USER_NAME/REPOSITORY:pull_request. They are also both using the READ_ROLE secret, which should point to the ARN of your reader IAM role.
In write-dev, there is environment: Development specified, which means that the ID token will have a subject claim of repo:ORG_OR_USER_NAME/REPOSITORY:environment:Development. The job uses the DEV_DEPLOY_ROLE secret instead of READ_ROLE.
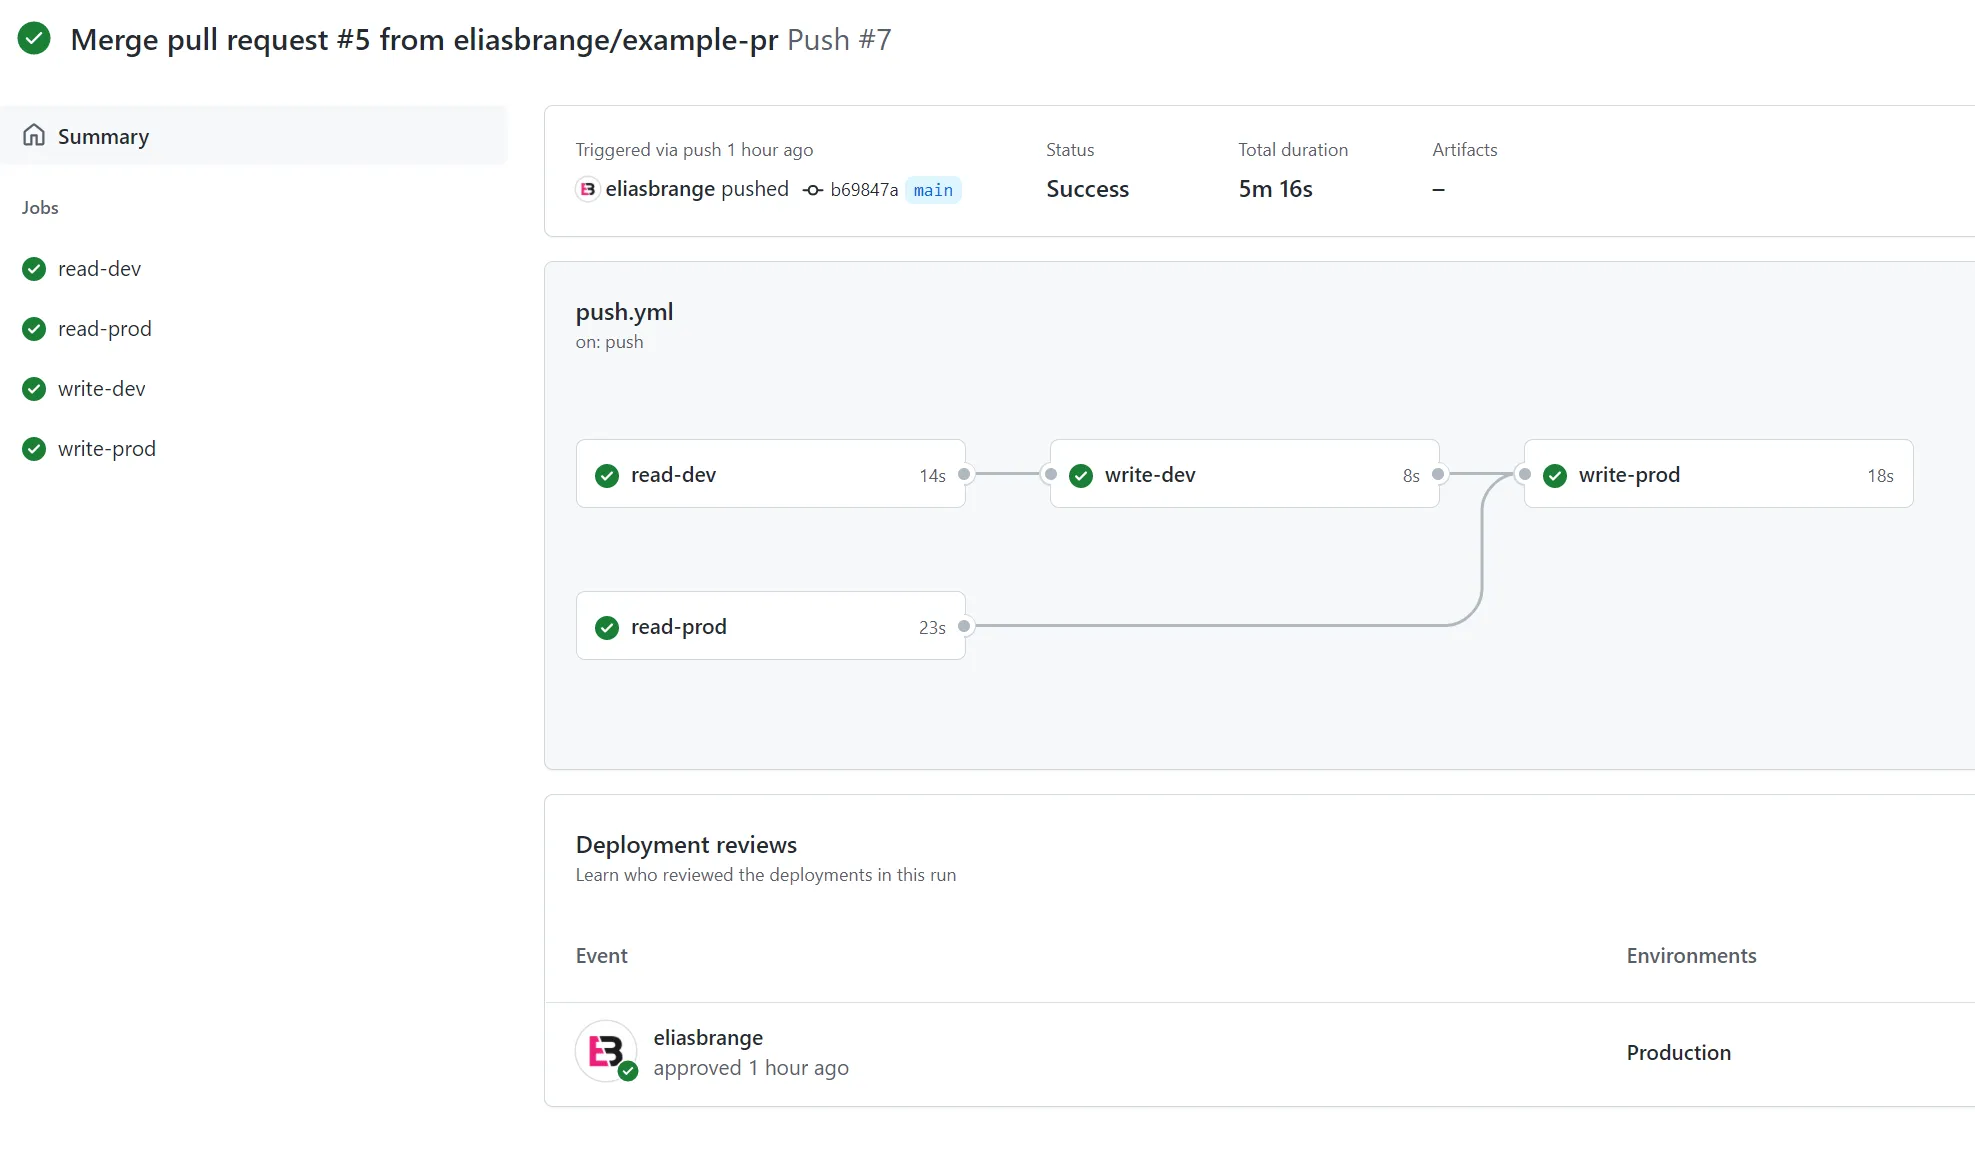
Push to main workflow
Add the following workflow to your repository:
name: 'Push'
# The workflow should only trigger on push events to the main branchon: push: branches: - main
# Required to get the ID Token that will be used for OIDCpermissions: id-token: write
jobs: read-dev: runs-on: ubuntu-latest steps: - name: Checkout uses: actions/checkout@v3
- name: Configure AWS Credentials uses: aws-actions/configure-aws-credentials@v1 with: aws-region: eu-west-1 role-to-assume: ${{ secrets.READ_ROLE }} role-session-name: OIDCSession
- run: aws s3 cp s3://YOUR_DEV_BUCKET/README.md README.md shell: bash
write-dev: runs-on: ubuntu-latest needs: read-dev environment: Development steps: - name: Checkout uses: actions/checkout@v3
- name: Configure AWS Credentials uses: aws-actions/configure-aws-credentials@v1 with: aws-region: eu-west-1 role-to-assume: ${{ secrets.DEV_DEPLOY_ROLE }} role-session-name: OIDCSession
- run: aws s3 cp README.md s3://YOUR_DEV_BUCKET/README.md shell: bash
read-prod: runs-on: ubuntu-latest steps: - name: Checkout uses: actions/checkout@v3
- name: Configure AWS Credentials uses: aws-actions/configure-aws-credentials@v1 with: aws-region: eu-west-1 role-to-assume: ${{ secrets.READ_ROLE }} role-session-name: OIDCSession
- run: aws s3 cp s3://YOUR_PROD_BUCKET/README.md README.md shell: bash
write-prod: needs: [read-prod, write-dev] runs-on: ubuntu-latest environment: Production steps: - name: Checkout uses: actions/checkout@v3
- name: Configure AWS Credentials uses: aws-actions/configure-aws-credentials@v1 with: aws-region: eu-west-1 role-to-assume: ${{ secrets.PROD_DEPLOY_ROLE }} role-session-name: OIDCSession
- run: aws s3 cp README.md s3://YOUR_PROD_BUCKET/README.md shell: bashAlmost the same as the previous workflow, but with the addition of a write-prod job.
- Download
README.mdfrom theDevelopmentbucket. - Upload
README.mdfrom the repository to theDevelopmentbucket. - Download
README.mdfrom theProductionbucket. - Upload
README.mdfrom the repository to theProductionbucket.
read-prod uses the same setup as read-dev, i.e. no environment and both use the READ_ROLE secret. The write-prod job is similar to the write-dev job, but uses environment: Production and the PROD_DEPLOY_ROLE secret.
Bonus workflow
This workflow is a bonus workflow that uses a matrix strategy to show the result of different combinations of subject claim, environment and role.
Add the following workflow to your repository:
name: 'Bonus'
on: pull_request: branches: - main
push: branches: - main
permissions: id-token: write
jobs: read-dev: strategy: fail-fast: false matrix: environment: - '' - Development - Production role_secret: - READ_ROLE - DEV_DEPLOY_ROLE - PROD_DEPLOY_ROLE runs-on: ubuntu-latest environment: ${{ matrix.environment }} steps: - name: Checkout uses: actions/checkout@v3
- name: Configure AWS Credentials uses: aws-actions/configure-aws-credentials@v1 with: aws-region: eu-west-1 role-to-assume: ${{ secrets[matrix.role_secret] }} role-session-name: OIDCSession
- run: aws s3 cp s3://YOUR_DEV_BUCKET/README.md README.md shell: bash
write-dev: strategy: fail-fast: false matrix: environment: - '' - Development - Production role_secret: - READ_ROLE - DEV_DEPLOY_ROLE - PROD_DEPLOY_ROLE runs-on: ubuntu-latest environment: ${{ matrix.environment }} steps: - name: Checkout uses: actions/checkout@v3
- name: Configure AWS Credentials uses: aws-actions/configure-aws-credentials@v1 with: aws-region: eu-west-1 role-to-assume: ${{ secrets[matrix.role_secret] }} role-session-name: OIDCSession
- run: aws s3 cp README.md s3://YOUR_DEV_BUCKET/README.md shell: bash
read-prod: strategy: fail-fast: false matrix: environment: - '' - Development - Production role_secret: - READ_ROLE - DEV_DEPLOY_ROLE - PROD_DEPLOY_ROLE runs-on: ubuntu-latest environment: ${{ matrix.environment }} steps: - name: Checkout uses: actions/checkout@v3
- name: Configure AWS Credentials uses: aws-actions/configure-aws-credentials@v1 with: aws-region: eu-west-1 role-to-assume: ${{ secrets[matrix.role_secret] }} role-session-name: OIDCSession
- run: aws s3 cp s3://YOUR_PROD_BUCKET/README.md README.md shell: bash
write-prod: strategy: fail-fast: false matrix: environment: - '' - Development - Production role_secret: - READ_ROLE - DEV_DEPLOY_ROLE - PROD_DEPLOY_ROLE runs-on: ubuntu-latest environment: ${{ matrix.environment }} steps: - name: Checkout uses: actions/checkout@v3
- name: Configure AWS Credentials uses: aws-actions/configure-aws-credentials@v1 with: aws-region: eu-west-1 role-to-assume: ${{ secrets[matrix.role_secret] }} role-session-name: OIDCSession
- run: aws s3 cp README.md s3://YOUR_PROD_BUCKET/README.md shell: bashThis workflow will be triggered by both pushes to main and pull requests. It will then try to perform reads and writes on both buckets with different combinations of environment and role_secret.
Results
With all the workflows pushed to main in your repository, create a new branch and create a pull request. If everything works correctly, the workflow named Pull Request should execute successfully. The Bonus workflow should fail for a lot of combinations (and it might take some time to fail due to the back-off strategy of the configure AWS credentials action).
If you merge the pull request, the workflow named Push should execute successfully.
Workflow combinations
Looking at the Bonus workflow we should be able to see which combinations of workflow event, environment and role that is possible with the OIDC setup we have. The working combinations should also be different depending on whether the workflow started from a push to main or a pull request.
For each of the 4 jobs, we should have 9 different combinations. These combinations are:
| # | Environment | Role |
|---|---|---|
| 1 | NONE | READ_ROLE |
| 2 | NONE | DEV_DEPLOY_ROLE |
| 3 | NONE | PROD_DEPLOY_ROLE |
| 4 | Development | READ_ROLE |
| 5 | Development | DEV_DEPLOY_ROLE |
| 6 | Development | PROD_DEPLOY_ROLE |
| 7 | Production | READ_ROLE |
| 8 | Production | DEV_DEPLOY_ROLE |
| 9 | Production | PROD_DEPLOY_ROLE |
Pull request
If we start by looking at a pull request, the workflow should have access to the READ_ROLE when the environment is NONE (which means that the subject claim will be repo:ORG_OR_USER_NAME/REPOSITORY:pull_request). This should allow the workflow to read both development and production buckets when using the combination of no environment and READ_ROLE.
It should also be able to use the Development environment since there are no protection rules for that environment. This should allow the workflow to both read and write to the development bucket when the environment is Development and role is DEV_DEPLOY_ROLE.
Due to the environment protection rule on Production, the workflow should not be able to use the Production environment at all when triggered by pull requests.
read-dev job
| # | Environment | Role | Result |
|---|---|---|---|
| 1 | NONE | READ_ROLE | Success |
| 2 | NONE | DEV_DEPLOY_ROLE | Fail: invalid claim |
| 3 | NONE | PROD_DEPLOY_ROLE | Fail: invalid claim |
| 4 | Development | READ_ROLE | Fail: invalid claim |
| 5 | Development | DEV_DEPLOY_ROLE | Success |
| 6 | Development | PROD_DEPLOY_ROLE | Fail: invalid claim |
| 7 | Production | READ_ROLE | Fail: environment protection rule |
| 8 | Production | DEV_DEPLOY_ROLE | Fail: environment protection rule |
| 9 | Production | PROD_DEPLOY_ROLE | Fail: environment protection rule |
write-dev job
| # | Environment | Role | Result |
|---|---|---|---|
| 1 | NONE | READ_ROLE | Fail: insufficient permissions |
| 2 | NONE | DEV_DEPLOY_ROLE | Fail: invalid claim |
| 3 | NONE | PROD_DEPLOY_ROLE | Fail: invalid claim |
| 4 | Development | READ_ROLE | Fail: invalid claim |
| 5 | Development | DEV_DEPLOY_ROLE | Success |
| 6 | Development | PROD_DEPLOY_ROLE | Fail: invalid claim |
| 7 | Production | READ_ROLE | Fail: environment protection rule |
| 8 | Production | DEV_DEPLOY_ROLE | Fail: environment protection rule |
| 9 | Production | PROD_DEPLOY_ROLE | Fail: environment protection rule |
read-prod job
| # | Environment | Role | Result |
|---|---|---|---|
| 1 | NONE | READ_ROLE | Success |
| 2 | NONE | DEV_DEPLOY_ROLE | Fail: invalid claim |
| 3 | NONE | PROD_DEPLOY_ROLE | Fail: invalid claim |
| 4 | Development | READ_ROLE | Fail: invalid claim |
| 5 | Development | DEV_DEPLOY_ROLE | Fail: insufficient permissions |
| 6 | Development | PROD_DEPLOY_ROLE | Fail: invalid claim |
| 7 | Production | READ_ROLE | Fail: environment protection rule |
| 8 | Production | DEV_DEPLOY_ROLE | Fail: environment protection rule |
| 9 | Production | PROD_DEPLOY_ROLE | Fail: environment protection rule |
write-prod job
| # | Environment | Role | Result |
|---|---|---|---|
| 1 | NONE | READ_ROLE | Fail: insufficient permissions |
| 2 | NONE | DEV_DEPLOY_ROLE | Fail: invalid claim |
| 3 | NONE | PROD_DEPLOY_ROLE | Fail: invalid claim |
| 4 | Development | READ_ROLE | Fail: invalid claim |
| 5 | Development | DEV_DEPLOY_ROLE | Fail: insufficient permissions |
| 6 | Development | PROD_DEPLOY_ROLE | Fail: invalid claim |
| 7 | Production | READ_ROLE | Fail: environment protection rule |
| 8 | Production | DEV_DEPLOY_ROLE | Fail: environment protection rule |
| 9 | Production | PROD_DEPLOY_ROLE | Fail: environment protection rule |
Push
Continuing to the workflow when triggered by a push to main, we should be able to again use the READ_ROLE when the environment is NONE. This should give read access to both buckets for that combination.
For writing to development, a combination of Development environment with DEV_DEPLOY_ROLE is required.
Finally, to deploy to production, a combination of Production environment with PROD_DEPLOY_ROLE is required. This should also trigger a manual approval step to continue the deployment.
read-dev job
| # | Environment | Role | Result |
|---|---|---|---|
| 1 | NONE | READ_ROLE | Success |
| 2 | NONE | DEV_DEPLOY_ROLE | Fail: invalid claim |
| 3 | NONE | PROD_DEPLOY_ROLE | Fail: invalid claim |
| 4 | Development | READ_ROLE | Fail: invalid claim |
| 5 | Development | DEV_DEPLOY_ROLE | Success |
| 6 | Development | PROD_DEPLOY_ROLE | Fail: invalid claim |
| 7 | Production | READ_ROLE | Fail: invalid claim |
| 8 | Production | DEV_DEPLOY_ROLE | Fail: invalid claim |
| 9 | Production | PROD_DEPLOY_ROLE | Fail: invalid claim |
write-dev job
| # | Environment | Role | Result |
|---|---|---|---|
| 1 | NONE | READ_ROLE | Fail: insufficient permissions |
| 2 | NONE | DEV_DEPLOY_ROLE | Fail: invalid claim |
| 3 | NONE | PROD_DEPLOY_ROLE | Fail: invalid claim |
| 4 | Development | READ_ROLE | Fail: invalid claim |
| 5 | Development | DEV_DEPLOY_ROLE | Success |
| 6 | Development | PROD_DEPLOY_ROLE | Fail: invalid claim |
| 7 | Production | READ_ROLE | Fail: invalid claim |
| 8 | Production | DEV_DEPLOY_ROLE | Fail: invalid claim |
| 9 | Production | PROD_DEPLOY_ROLE | Fail: invalid claim |
read-prod job
| # | Environment | Role | Result |
|---|---|---|---|
| 1 | NONE | READ_ROLE | Success |
| 2 | NONE | DEV_DEPLOY_ROLE | Fail: invalid claim |
| 3 | NONE | PROD_DEPLOY_ROLE | Fail: invalid claim |
| 4 | Development | READ_ROLE | Fail: invalid claim |
| 5 | Development | DEV_DEPLOY_ROLE | Fail: insufficient permissions |
| 6 | Development | PROD_DEPLOY_ROLE | Fail: invalid claim |
| 7 | Production | READ_ROLE | Success |
| 8 | Production | DEV_DEPLOY_ROLE | Fail: invalid claim |
| 9 | Production | PROD_DEPLOY_ROLE | Fail: invalid claim |
write-prod job
| # | Environment | Role | Result |
|---|---|---|---|
| 1 | NONE | READ_ROLE | Fail: insufficient permissions |
| 2 | NONE | DEV_DEPLOY_ROLE | Fail: invalid claim |
| 3 | NONE | PROD_DEPLOY_ROLE | Fail: invalid claim |
| 4 | Development | READ_ROLE | Fail: invalid claim |
| 5 | Development | DEV_DEPLOY_ROLE | Fail: insufficient permissions |
| 6 | Development | PROD_DEPLOY_ROLE | Fail: invalid claim |
| 7 | Production | READ_ROLE | Fail: invalid claim |
| 8 | Production | DEV_DEPLOY_ROLE | Fail: invalid claim |
| 9 | Production | PROD_DEPLOY_ROLE | Success |
Conclusions
Starting from this example, you should now be able to use GitHub OIDC as a federated identity in your own GitHub Actions workflows to get rid of long-lived credentials once and for all. You have learned how to:
- Enable federated identity for GitHub on the AWS side
- Define which repositories and workflow events are allowed to access your roles
- Keep your production environments secure by requiring additional steps
Hope you learned a thing or two. Now go build something awesome.
GitHub repository
I have a companion repository available on GitHub for this blog post, where you can find the workflows themselves, as well as terraform configuration for setting up the AWS side.