Migrate DynamoDB tables with zero downtime and no data loss
Introduction
Migrating data with zero downtime and no data loss has always been a challenge. The new functionality with native import from S3 in DynamoDB helps us solve this. Most docs refer you to the console or CLI to do this. I found a yet-to-be-announced feature of CloudFormation to create a table from an S3 export. By doing it through CloudFormation and not through the console, you save yourself the headache of having to import the new table into a stack.
In this guide, I will show you how to migrate a DynamoDB table to a new account. You will use the native export/import to S3 functionalities to do this. Before AWS released the import functionality, you had to use glue services to import a table from S3. Now you can specify the bucket that holds your exported data and create a new table from it.
Note
I’m using yet-to-be-announced features of CloudFormation in this guide. The API and configuration settings might not be stable.
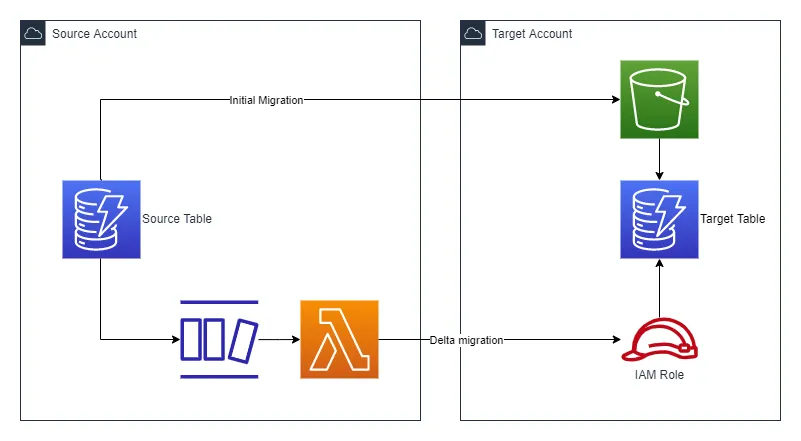
You can see the architecture for the solution in the image below. You will do the initial migration by using the native export to and import from S3 functionality. You will then set up delta migration with a DynamoDB stream and a Lambda function.
Starting point
To keep things simple, I have chosen to only include a DynamoDB table in the application. To follow along with the examples, you will need access to two AWS Accounts; Source and Target.
-
To start, lets create an application and install dependencies:
Terminal window $ mkdir app$ cd app$ cdk init app --language=typescript --generate-onlyApplying project template app for typescript# Welcome to your CDK TypeScript project...✅ All done!$ yarnyarn install v1.22.18warning package.json: No license fieldinfo No lockfile found.warning app@0.1.0: No license field[1/4] Resolving packages...[2/4] Fetching packages...[3/4] Linking dependencies...[4/4] Building fresh packages...success Saved lockfile.Done in 19.49s. -
Replace the code in
lib/app-stack.tswith the following. This code creates a DynamoDB table namedMyTable:lib/app-stack.ts import * as cdk from 'aws-cdk-lib';import { Construct } from 'constructs';import * as dynamodb from 'aws-cdk-lib/aws-dynamodb';export class AppStack extends cdk.Stack {public readonly table: dynamodb.Table;constructor(scope: Construct, id: string, props?: cdk.StackProps) {super(scope, id, props);this.table = new dynamodb.Table(this, 'Table', {tableName: 'MyTable',partitionKey: { name: 'pk', type: dynamodb.AttributeType.STRING },billingMode: dynamodb.BillingMode.PAY_PER_REQUEST,});}} -
Bootstrap your
Sourceaccount by runningcdk bootstrap. -
Deploy you application to the
Sourceaccount withcdk deploy AppStack. -
Make sure to bootstrap your
Targetaccount as well.
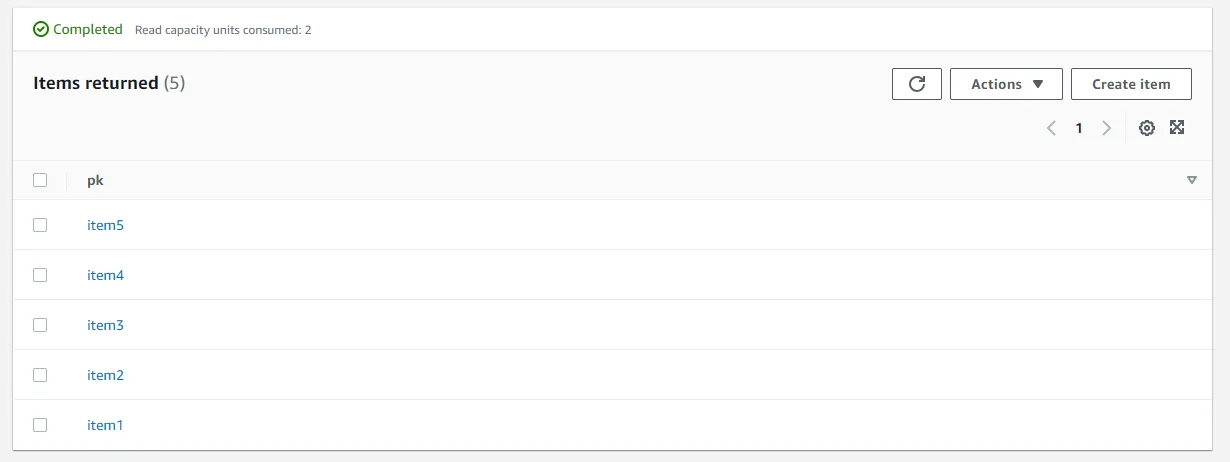
If you go to the DynamoDB console, you should see a table named MyTable. For the remainder of this example, we will use this console as the UI of our imaginary application. Before continuing, add a few items to your table so you have something to export later on.
Tutorial
Note
The steps below requires you to alternate your credentials between the
Source and Target accounts.
1. Enable point-in-time recovery and stream on source table
The export functionality of DynamoDB requires you to enable point-in-time recovery. You also need to enable a DynamoDB stream to stream any changes made to the table after you trigger the export. To enable both, add the following lines in lib/app-stack.ts:
this.table = new dynamodb.Table(this, 'Table', { tableName: 'MyTable', partitionKey: { name: 'pk', type: dynamodb.AttributeType.STRING }, billingMode: dynamodb.BillingMode.PAY_PER_REQUEST, pointInTimeRecovery: true, stream: dynamodb.StreamViewType.NEW_IMAGE,});
// Outputsnew cdk.CfnOutput(this, 'TableStreamArn', { value: this.table.tableStreamArn || '',});Deploy the updated stack to the Source account. You will need the ARN of the stream later on.
2. Deploy S3 bucket and IAM role in target account
You will now create the required resources in the Target account. You will need an S3 bucket to which you will export the source table. You will also need an IAM role, with permissions to write items to the imported DynamoDB table. You will assume this role in the Lambda function in the Source account.
Create the file lib/target-stack.ts and add the following:
import * as cdk from 'aws-cdk-lib';import { Construct } from 'constructs';import * as iam from 'aws-cdk-lib/aws-iam';import * as s3 from 'aws-cdk-lib/aws-s3';
interface TargetStackProps extends cdk.StackProps { sourceAccount: string;}
export class TargetStack extends cdk.Stack { constructor(scope: Construct, id: string, props?: TargetStackProps) { super(scope, id, props);
// Create Bucket that will hold exported data from Source DynamoDB const migrationBucket = new s3.Bucket(this, 'MigrationBucket', {});
// Allow source account to list bucket migrationBucket.addToResourcePolicy( new iam.PolicyStatement({ principals: [new iam.AccountPrincipal(props?.sourceAccount)], actions: ['s3:ListBucket'], resources: [migrationBucket.bucketArn], }), );
// Allow source account to write to bucket migrationBucket.addToResourcePolicy( new iam.PolicyStatement({ principals: [new iam.AccountPrincipal(props?.sourceAccount)], actions: ['s3:AbortMultipartUpload', 's3:PutObject', 's3:PutObjectAcl'], resources: [migrationBucket.arnForObjects('*')], }), );
// Role for cross-account access to new DynamoDB table const role = new iam.Role(this, 'CrossAccountDynamoDBRole', { assumedBy: new iam.AccountPrincipal(props?.sourceAccount), managedPolicies: [ iam.ManagedPolicy.fromAwsManagedPolicyName('AmazonDynamoDBFullAccess'), ], });
// Outputs new cdk.CfnOutput(this, 'MigrationBucketOutput', { value: migrationBucket.bucketArn, });
new cdk.CfnOutput(this, 'CrossAccountDynamoDBRoleOutput', { value: role.roleArn, }); }}This creates an S3 bucket with the necessary permissions for DynamoDB to export data to it. You can read more about the required permissions in the AWS documentation. It also creates an IAM role and attaches the managed policy AmazonDynamoDBFullAccess. The role’s trust policy allows the Source account to assume it.
In bin/app.ts, add the following:
#!/usr/bin/env nodeimport * as cdk from 'aws-cdk-lib';import { AppStack } from '../lib/app-stack';import { TargetStack } from '../lib/target-stack';
// Change theseconst targetAccount = '111111111111';const sourceAccount = '222222222222';
const app = new cdk.App();new AppStack(app, 'AppStack', { env: { account: process.env.CDK_DEFAULT_ACCOUNT, region: process.env.CDK_DEFAULT_REGION, },});new TargetStack(app, 'TargetStack', { env: { account: targetAccount, region: process.env.CDK_DEFAULT_REGION, }, sourceAccount,});Deploy the stack to the Target account by running cdk deploy TargetStack.
3. Deploy (disabled) Lambda function for streaming data in source account
You will now create a Lambda function in the Source account. This function will subscribe to the DynamoDB stream of the source table. Exporting a table will capture the state at the time of the export. But you might still have live traffic coming into the old application that you will need to migrate as well. The Lambda function lets you replicate all those delta changes to the target table.
You will first deploy the Lambda function in a disabled state. While the export and import are in progress, the stream will store all changes made to the source table. When the export/import is complete, you will then enable it to replicate the changes in the target table.
Note
DynamoDB streams can only store records for up to 24 hours. Thus, you must be able to export all data, import it to a new table, and enable the stream within 24 hours. Otherwise, you will lose data.
Let’s start with the Lambda function. You’ll need a few development dependencies.
$ yarn add --dev \ @types/aws-lambda \ @aws-sdk/client-sts \ @aws-sdk/credential-providers \ @aws-sdk/client-dynamodbCreate a new folder functions/ under lib/ and create the file lib/functions/stream-handler.ts with the following code:
import { DynamoDBStreamEvent } from 'aws-lambda';import { AssumeRoleCommandInput } from '@aws-sdk/client-sts';import { DynamoDBClient, DeleteItemCommand, DeleteItemCommandInput, PutItemCommand, PutItemCommandInput, AttributeValue,} from '@aws-sdk/client-dynamodb';import { fromTemporaryCredentials } from '@aws-sdk/credential-providers';
const tableName = process.env.TARGET_TABLE;
// Use STS to assume the role in target accountconst params: AssumeRoleCommandInput = { RoleArn: process.env.TARGET_ROLE, RoleSessionName: 'Cross-Acct-DynamoDB',};
const client = new DynamoDBClient({ credentials: fromTemporaryCredentials({ params }),});
export const handler = async (event: DynamoDBStreamEvent) => { for (const record of event.Records) { if (record.eventName === 'REMOVE') { // Item was deleted, remove it from target table const input: DeleteItemCommandInput = { TableName: tableName, Key: record.dynamodb?.Keys as Record<string, AttributeValue>, }; await client.send(new DeleteItemCommand(input)); } else { // Item was created or modified, write it to the target table const input: PutItemCommandInput = { TableName: tableName, Item: record.dynamodb?.NewImage as Record<string, AttributeValue>, }; await client.send(new PutItemCommand(input)); } }};This is a simple Lambda function that will subscribe to events from a DynamoDB stream. It takes two environment variables, TARGET_TABLE and TARGET_ROLE. It uses AWS STS to generate temporary credentials for the role in the target account. It then loops over all incoming records and replicates the changes in the target table. I have left out stuff like error handling and logging for clarity.
Add a new stack file lib/source-stack.ts with the following code:
import * as cdk from 'aws-cdk-lib';import { Construct } from 'constructs';import * as lambda from 'aws-cdk-lib/aws-lambda-nodejs';import * as dynamo from 'aws-cdk-lib/aws-dynamodb';import * as iam from 'aws-cdk-lib/aws-iam';import { Runtime, StartingPosition } from 'aws-cdk-lib/aws-lambda';import { DynamoEventSource } from 'aws-cdk-lib/aws-lambda-event-sources';
interface SourceStackProps extends cdk.StackProps { targetRole: string; tableName: string; sourceStreamArn: string;}
export class SourceStack extends cdk.Stack { constructor(scope: Construct, id: string, props: SourceStackProps) { super(scope, id, props);
const fn = new lambda.NodejsFunction(this, 'StreamHandler', { runtime: Runtime.NODEJS_16_X, entry: 'lib/functions/stream-handler.ts', memorySize: 1024, depsLockFilePath: 'yarn.lock', handler: 'handler', environment: { TARGET_ROLE: props.targetRole, TARGET_TABLE: props.tableName, }, });
// Let the Lambda function assume the role in the target account fn.addToRolePolicy( new iam.PolicyStatement({ actions: ['sts:AssumeRole'], resources: [props.targetRole], }), );
// Adding a stream as an event source requires a Table object. const sourceTable = dynamo.Table.fromTableAttributes(this, 'SourceTable', { tableName: props.tableName, tableStreamArn: props.sourceStreamArn, });
fn.addEventSource( new DynamoEventSource(sourceTable, { startingPosition: StartingPosition.TRIM_HORIZON, batchSize: 100, enabled: false, }), ); }}Add the new stack to bin/app.ts. It can be tricky to cross-reference values from different accounts. Since this is temporary anyway, we hardcode the variables tableRole, tableName, and sourceStreamArn. You can find the targetRole and sourceStreamArn in the outputs of the respective stacks.
...import { SourceStack } from '../lib/source-stack';
const targetAccount = '111111111111';const sourceAccount = '222222222222';const targetRole = 'ROLE_ARN_FROM_TARGET_STACK_OUTPUT';const tableName = 'MyTable'const sourceStreamArn = 'YOUR_SOURCE_TABLE_STREAM_ARN'
new AppStack(...);new TargetStack(...);new SourceStack(app, 'SourceStack', { env: { account: sourceAccount, region: process.env.CDK_DEFAULT_REGION, }, targetRole, tableName, sourceStreamArn,});Deploy the stack to the Source account with cdk deploy SourceStack.
4. Export source table to S3 bucket in target account
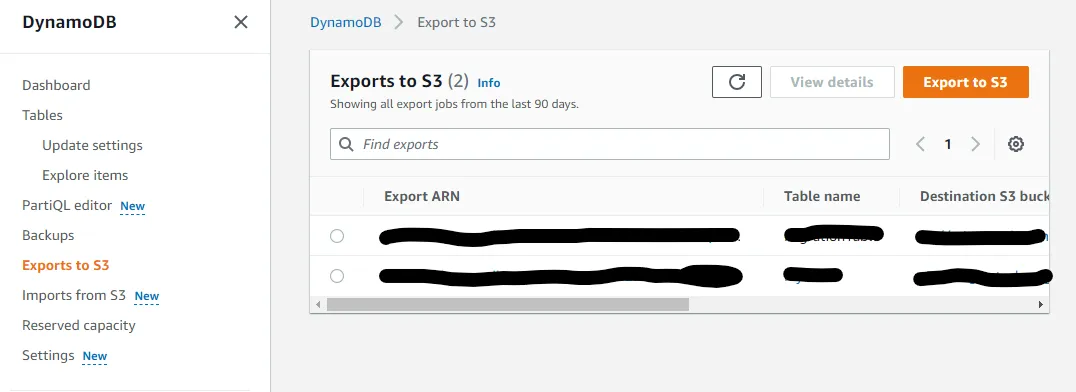
Log in to the AWS console in the Source account. Navigate to the DynamoDB console and click on Exports to S3 on the left- hand side.
Click the Export to S3 button to bring up the export configuration. Enter your bucket name and an optional prefix. Using prefixes can be useful if you want to migrate multiple tables. Also, make sure to check A different AWS account and enter your Target account number. Finally, click the Export button.
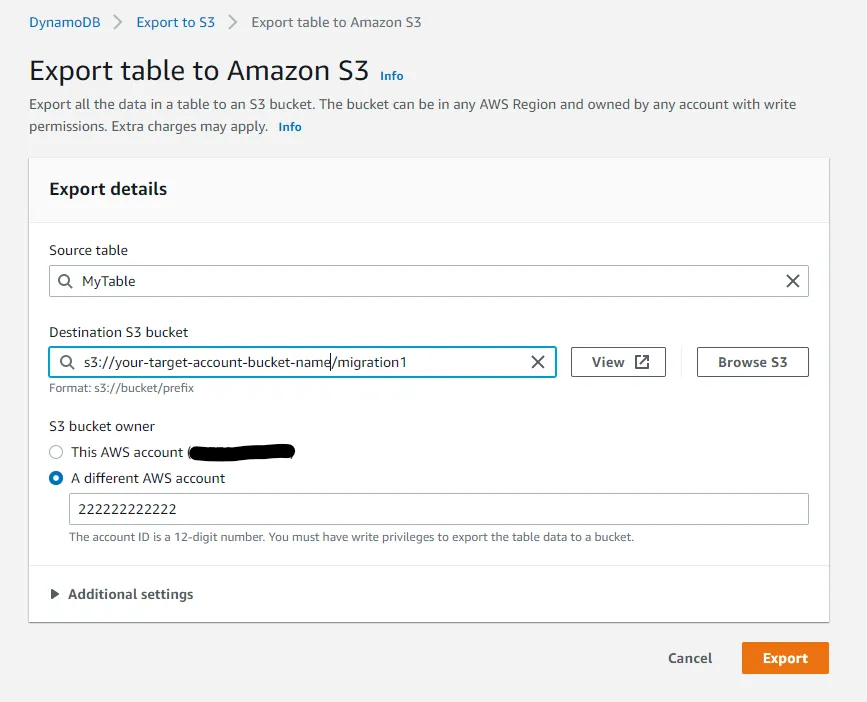
Your migration has now started, and it can take a while for it to finish. You can check on the progress in the console.

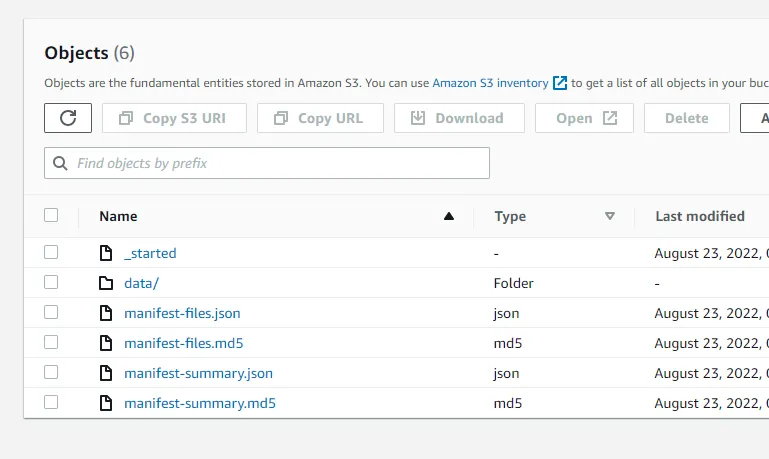
When the migration changes status to completed, log in to the Target account and head over to the S3 console. Open your migration bucket and you should find your exported data under the prefix migration1/AWSDynamoDB/some-auto-generated-id/.
5. Update and delete some items in the source table
Now that your export is complete you will want to simulate some more traffic. Create, change, and delete some items in your source table. After your migration, you will want to have these delta updates replicated in the target table. This gives us a zero downtime migration with no data loss.
6. Deploy application stack with import configuration in target account
Here comes the magic part. AWS recently released support for creating a table from an S3 export, without requiring any glue services. But, all guides direct you to the console to do this. Doing it through the console means you have to resort to importing resources into CloudFormation if you want to manage your databases with, for example, CDK.
While searching the docs I stumbled upon a yet-to-be-announced feature in CloudFormation. A new property on the AWS::DynamoDB::Table resource called ImportSourceSpecification. The documentation says that the property is Not currently supported by AWS CloudFormation. I’ve tested it, and it works. Always be careful though when using undocumented and unreleased features.
You will now update your AppStack to use this new property. Since the feature is not announced yet, you need to use raw overrides in CDK. You can read more about using overrides and other escape hatches here.
During the migration, your application will still be live in the Source account. Since you might need to release an urgent update there, you need to keep the stack in a deployable state for both accounts. You will thus only add the ImportSourceSpecification configuration if you are deploying to the Target account.
Update the AppStack to accept the following properties:
import * as cdk from 'aws-cdk-lib';import { Construct } from 'constructs';import * as dynamodb from 'aws-cdk-lib/aws-dynamodb';
interface AppStackProps extends cdk.StackProps { targetAccount: string; importS3Bucket: string; importS3Prefix: string;}
export class AppStack extends cdk.Stack { public readonly table: dynamodb.Table;
constructor(scope: Construct, id: string, props: AppStackProps) { super(scope, id, props);
this.table = new dynamodb.Table(this, 'Table', { tableName: 'MyTable', partitionKey: { name: 'pk', type: dynamodb.AttributeType.STRING }, billingMode: dynamodb.BillingMode.PAY_PER_REQUEST, pointInTimeRecovery: true, stream: dynamodb.StreamViewType.NEW_IMAGE, }); }}Update bin/app.ts as well. The importS3Prefix should point to the data/ subfolder in the migration folder. In the example above, importS3Prefix should be migration1/AWSDynamoDB/some-auto-generated-id/data/
const targetRole = '...';const importS3Bucket = 'your-bucket-name'; // without s3://const importS3Prefix = 'prefix/AWSDynamoDB/some-auto-generated-id/data/';
const app = new cdk.App();new AppStack(app, 'AppStack', { env: { account: process.env.CDK_DEFAULT_ACCOUNT, region: process.env.CDK_DEFAULT_REGION, }, targetAccount, importS3Bucket, importS3Prefix,});Now, conditionally add the ImportSourceSpecification configuration in lib/app-stack.ts:
export class AppStack extends cdk.Stack { public readonly table: dynamodb.Table;
constructor(scope: Construct, id: string, props: AppStackProps) { super(scope, id, props);
this.table = new dynamodb.Table(...);
// Only add ImportSourceSpecification if deploying to target account if (props.targetAccount && props.targetAccount === props.env?.account) { const cfnTable = this.table.node.defaultChild as dynamodb.CfnTable;
// ImportSourceSpecification is not yet supported on Table or CfnTable cfnTable.addPropertyOverride( 'ImportSourceSpecification.S3BucketSource.S3Bucket', props.importS3Bucket, ); cfnTable.addPropertyOverride( 'ImportSourceSpecification.S3BucketSource.S3KeyPrefix', props.importS3Prefix, ); cfnTable.addPropertyOverride( 'ImportSourceSpecification.InputCompressionType', 'GZIP', ); cfnTable.addPropertyOverride( 'ImportSourceSpecification.InputFormat', 'DYNAMODB_JSON', ); } }}The default behavior when exporting is to use the DynamoDB JSON format and GZIP compression, so we use those defaults when importing as well.
Deploy your stack in the Target account by running cdk deploy AppStack.
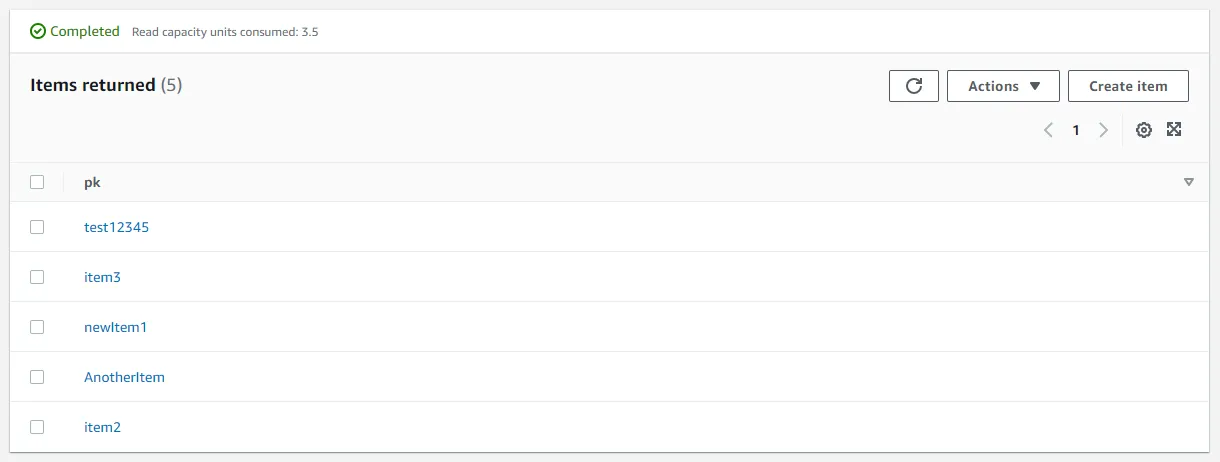
Open the DynamoDB console in the Target account and click on Imports from S3 on the left-hand side. You should see the import process starting.

When the import is complete, your table should be populated with the same data as the source table was at the time of the export.
7. Enable the streaming Lambda function in source account
You have now completed the initial migration. Now it’s time to replicate all changes that happened in step 5, after your initial export.
Flip the enabled switch to true in your Lambda function in lib/source-stack.ts:
fn.addEventSource( new DynamoEventSource(sourceTable, { startingPosition: StartingPosition.TRIM_HORIZON, batchSize: 100, enabled: true, }),);Deploy the updated stack in the Source account with cdk deploy SourceStack.
After some time, all changes that happened after you exported the source table should be replicated to the target table. Your databases should now fully match and you should be able direct all traffic to your migrated application.
Conclusion
There you go. You have successfully migrated a DynamoDB table to another account, with zero downtime and no data loss.
The new Import from S3 functionality makes it easy to migrate tables to another account. Before this, migration of tables required much more effort. You needed more glue services for the initial migration. Now, you have the native import functionality and yet-to-be-announced CloudFormation support. They make it simple to migrate tables and reuse your existing stack templates in a new account. Not having to import resources into a stack is also a huge win.