Setup a CI/CD pipeline for AWS SAM with GitHub Actions
Whenever I start a new AWS SAM project I usually start from a previous project. To help my future self, and hopefully you, I have created a GitHub template repository to easily get started with a new project powered by AWS SAM and GitHub actions.
Repository link
Overview
The repository template contains a very simple AWS SAM template that contains a single Lambda function that returns a random quote from https://api.quotable.io when invoked. The Lambda is written in Python, and the repository contains a simple workflow for linting using flake8 and running unit tests with pytest.
The repository is setup to handle three different environments, development, stage and production. The way I have set it up is that development can be deployed to manually from any branch, while stage and production deploys are triggered by publishing a GitHub release.
The repository also showcases how to use a composite GitHub action to reduce duplication in the workflows.
Sounds interesting? Keep reading!
What is AWS SAM?
SAM is short for Serverless Application Model. It is an extension of AWS CloudFormation and can be used to easily build serverless applications on AWS. SAM also comes with a powerful CLI that lets you invoke your functions or start your APIs locally.
Find out more in the official documentation.
Setup
1. Install AWS SAM CLI
To follow along you will need to install the AWS SAM CLI. This can easily be accomplished with Python’s pip:
$ pip3 install aws-sam-cliTo verify your installation you can run the following:
$ sam --versionSAM CLI, version 1.33.02. AWS Account(s)
You will need at least one AWS account to which you can deploy the environments. When deploying this in a real scenario, I would recommend to keep the environments separated and keep each in its own AWS account. You will need AWS credentials for the account(s) you intend to use.
Principle of least privilege
Separating environments in different accounts is a good way to adhere to the principle of least privilege. This way you can give teams and departments only the required levels of access in the respective accounts.
3. Bootstrap infrastructure
When you have your AWS account(s) in order you are ready to bootstrap the required infrastructure to let AWS SAM deploy into the accounts. This can be easily done with the CLI.
If you are an advanced user that wants more control over i.e. the IAM roles or buckets, check out the bootstrap documenation on how to do that.
$ sam pipeline bootstrap --stage dev --profile dev-profile...The following resources were created in your account: ...Pipeline IAM user credential: AWS_ACCESS_KEY_ID: XXXX AWS_SECRET_ACCESS_KEY: XXXX
$ sam pipeline bootstrap --stage stage --profile stage-profile...
$ sam pipeline bootstrap --stage prod --profile prod-profile...The bootstrap command creates the following resources in your account:
- An IAM user, that will be added to GitHub. (Pipeline IAM user in output)
- A Pipeline role, that will be assumed by the IAM user to trigger deployments. (Pipeline execution role in output)
- A Deploy role, that will be assumed by CloudFormation to deploy your resources. (CloudFormation execution role in output)
- An S3 bucket, to hold build artifacts. (Artifact bucket in output)
Write down the access keys that are shown to you in the CLI output, they will only be shown to you once. If you should lose them, you will have to generate new ones from the AWS console.
When you have bootstrapped your environments, if you log in to your account and go to the CloudFormation console you should see something like this:

IAM User
If you chose to bootstrap the environments into the same AWS account, only one IAM user will be created.
4. Create a new repository
Go to the repository and click the Use this template button.
5. Setup GitHub environments
GitHub environments availability
GitHub environments are only available in public repositories. If you want to use them in private repositories, you need GitHub Enterprise.
Read more in the GitHub Docs.
To create an environment on GitHub, go to Settings > Environments > New environment. The workflows assumes that the three environments are named development, stage and production so make sure to use those names.
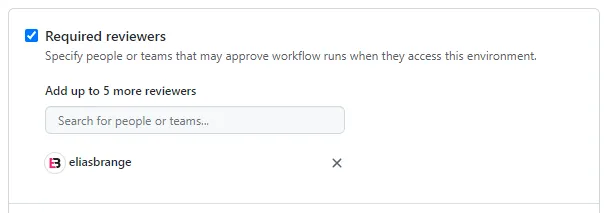
For the production environment, I recommend that you add a protection rule. This way a deployment to production will require a sign-off before proceeding.
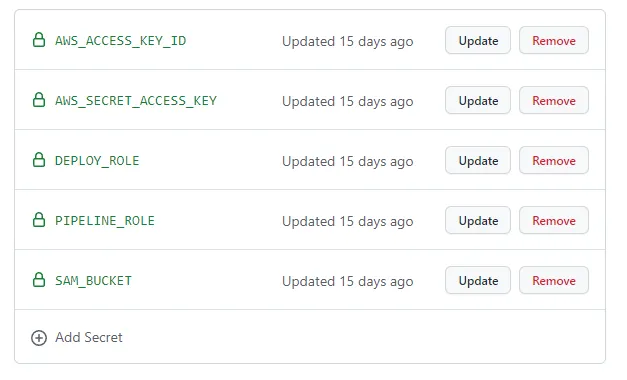
Now it is time to configure each environment with the required secrets. The required values should have been given in the output of each bootstrap command, otherwise they should be easy to find in the AWS console.
To create an environment secret, go to Settings > Environments > ENV_NAME > Add Secret.
For each environment we will use the following five environment secrets:
Double check
Make sure you enter the correct secrets in the correct environment. Development bootstrap resources goes into development secrets and so on…
AWS_ACCESS_KEY_ID & AWS_SECRET_ACCESS_KEY
These are the access credentials for the IAM user(s) create by the CLI bootstrap command. If you decided to only use a single AWS account, only one user will have been created and you can then just add the same credentials across all environments.
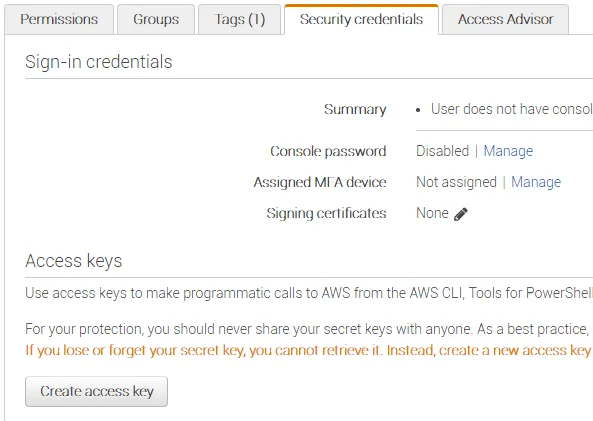
If you didn’t save the output from the command you can easily generate new credentials via the AWS console.
- First, navigate to the CloudFormation stack in the AWS console, it’s name should be something close to aws-sam-cli-managed-dev-pipeline-resources.
- Under the resources tab you can see all resources created by the bootstrap command. Look for the one with the logical ID PipelineUser.

- Clicking the link in the Physical ID column will take you to the IAM console, and if you change to the Security credentials tab you should be able to find the button labeled Create access key.
DEPLOY_ROLE
This should be the ARN (Amazon Resource Name) of the created CloudFormation execution role. To find the ARN, go to the bootstrap stack in the CloudFormation console and navigate to the Outputs tab. It should be listed with the key CloudFormationExecutionRole.
PIPELINE_ROLE
This should be the ARN of the the created Pipeline execution role. It should also be listed in the stack outputs with the key PipelineExecutionRole.
SAM_BUCKET
This should be the name (not ARN) of the created S3 bucket. You can find the ARN of the bucket in the outputs of the stack with the key ArtifactsBucket. The bucket name is the last part of the ARN:
arn:aws:s3:::aws-sam-cli-managed-dev-pipeline-artifactsbucket-1234567
6. Setup complete
After you have added all five secrets in each respective environment the setup should be done.
What you hopefully have accomplished so far:
- Bootstrapped three environments: development, stage and production
- Created a new GitHub repository from the template.
- Configured each environment with the correct secrets in GitHub.
Repository contents
Now that everything is setup, lets take a deeper dive into the contents of the repository.
1. SAM files
The heart of the repository is the template.yml file. This is where all the resources that should be deployed by SAM are defined. In this case, it only contains a single Lambda function coupled with an IAM role and a CloudWatch LogGroup.
There is also a samconfig.toml file that holds some configuration for the SAM CLI, such as what prefixes to use in the Artifacts bucket for each environment.
2. Python Lambda files
The actual files that will be uploaded to Lambda can be found in the src/ folder. The runtime dependencies are defined in src/requirements.txt and they will be installed and bundled with the application automatically by AWS SAM.
The repository also contains a test/ folder that contains unit tests for the application, which will be executed by pytest as part of the workflows.
3. Workflows
The repository contains three workflows.
LintAndTest
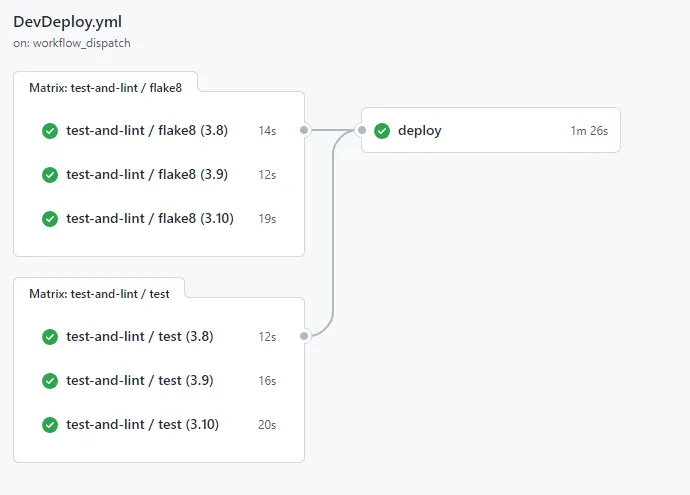
LintAndTest.yml runs on every push event to the repository. It contains two jobs, linting and unit tests, that will run in parallel. Here you can also see how to easily define a test matrix, in this case both jobs run with python versions 3.8, 3.9 and 3.10. This workflow also has the workflow_call trigger, you will see why later.
DevDeploy
DevDeploy.yml is a manually triggered workflow. It will deploy the SAM application to the development environment. Here I have tried to showcase two nice features of GitHub actions.
The first is the workflow_call trigger. Here we trigger the LintAndTest workflow from within the DevDeploy workflow. This allows us to minimize duplication and follow the DRY principle.
The second feature is what GitHub refers to composite actions. In the DevDeploy workflow we call a composite action inside the same repository which can be found in .github/actions/deploy/action.yml. This action is responsible for the actual sam deploy command, and by having all parameters as inputs we can reuse the same action whether we are deploying to development, stage or production.
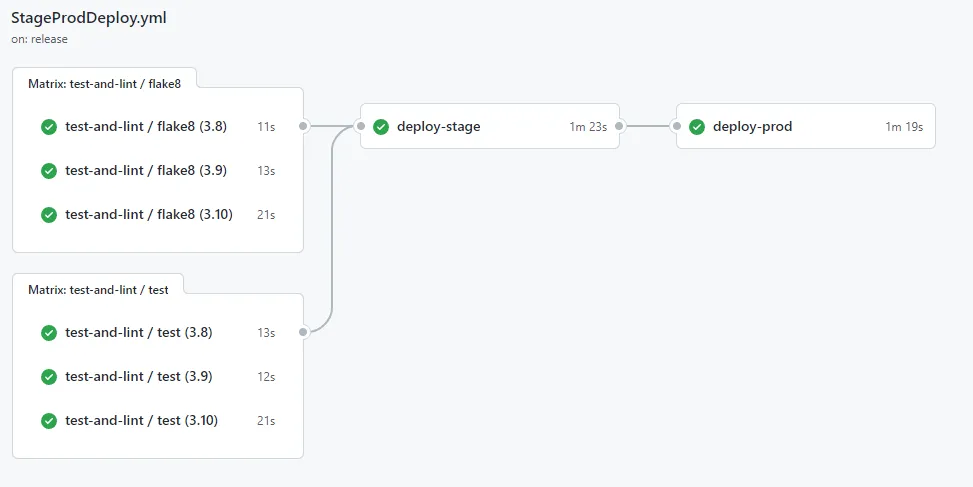
StageProdDeploy
StageProdDeploy.yml is triggered whenever a GitHub release is published. It will first deploy the SAM application to the stage environment, and and then deploy it to production. This workflow also utilizes the LintAndTest workflow as well as the deploy action mentioned above.
If you followed my advice earlier and enabled protection rules for the production environment it will require a manual approval whenever the workflow runs.
Let’s deploy!
Now that you have a good notion of what the repository contains it is time to actually test it out.
1. Deploy a feature branch to development
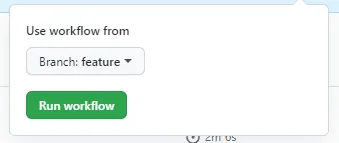
We will start with deploying to the development environment. Imagine that you are working on a new feature on a branch and want to deploy that specific branch.
Go to the Actions tab and select the DevDeploy workflow on the left pane and click Run workflow. In the dropdown, select the name of your feature branch and finally click Run workflow.

The workflow will now start, and if everything is correctly configured (fingers crossed) the workflow summary should look something like this.
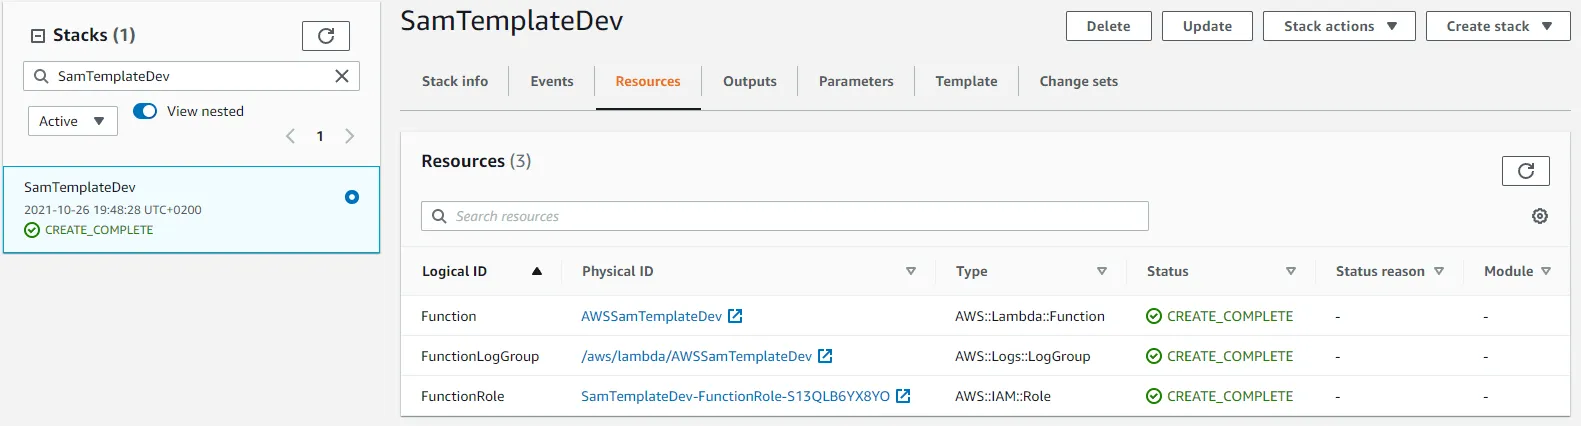
Let’s go to the CloudFormation console and find out what we just accomplished. You should see a stack named SamTemplateDev that contains resources defined in the SAM template.
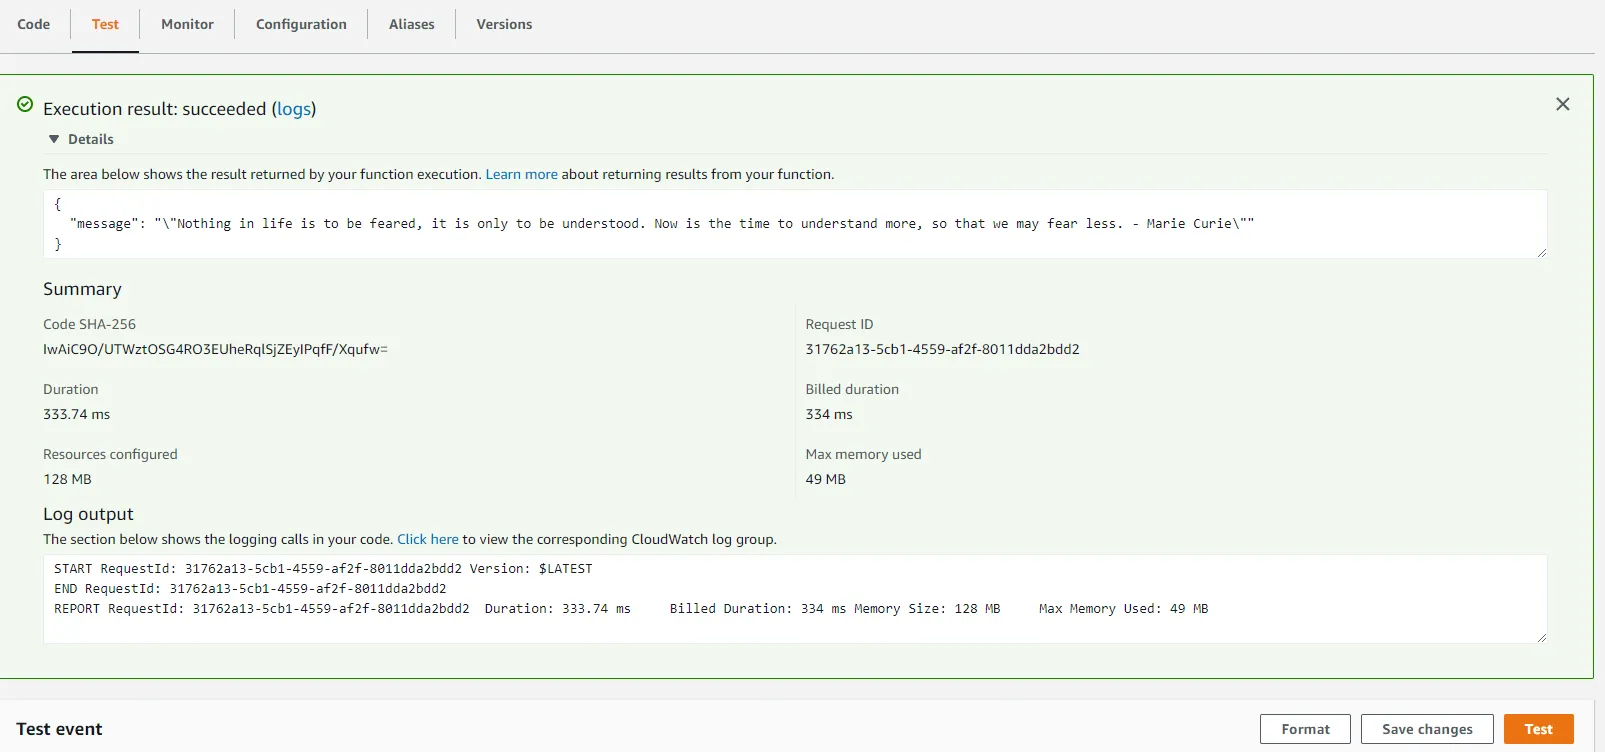
Head over to the Lambda console (or follow the link in the CloudFormation resources tab) and switch to the Test tab. Click the Test button to invoke your function and you should be greeted with a quote in the resulting execution logs.
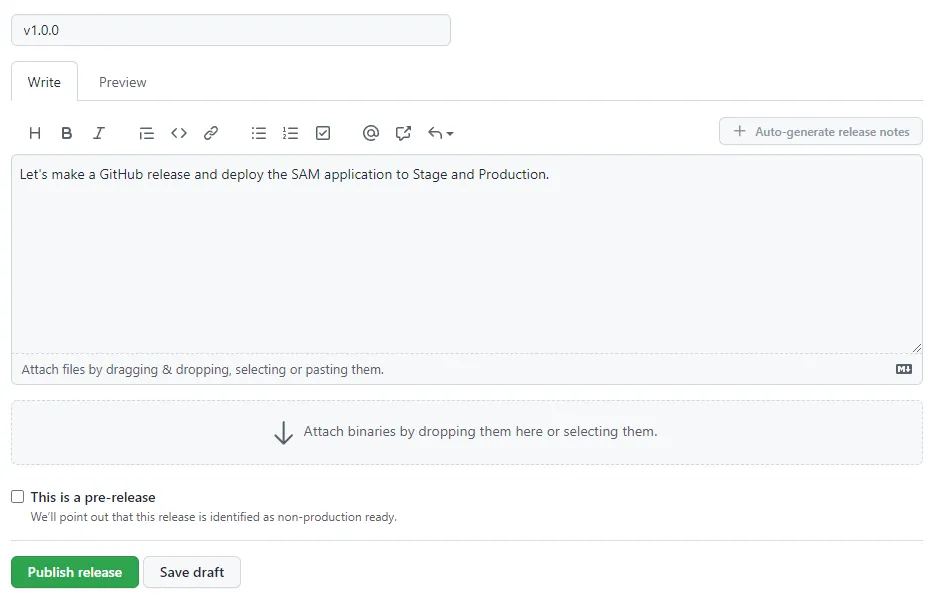
2. Let’s release that feature!
The feature is complete and you can’t wait to deploy it so your customers can enjoy endless quotes. It is time to deploy it to stage and hopefully production if everything goes well. Go to GitHub and create a new release.
The release will trigger the StageProdDeploy workflow. If you followed my advice earlier and enabled protection rules for the production environment it will require a manual approval whenever the workflow runs. If you did not enable protection rules, production will automatically be deployed as soon as the stage deploy is finished.
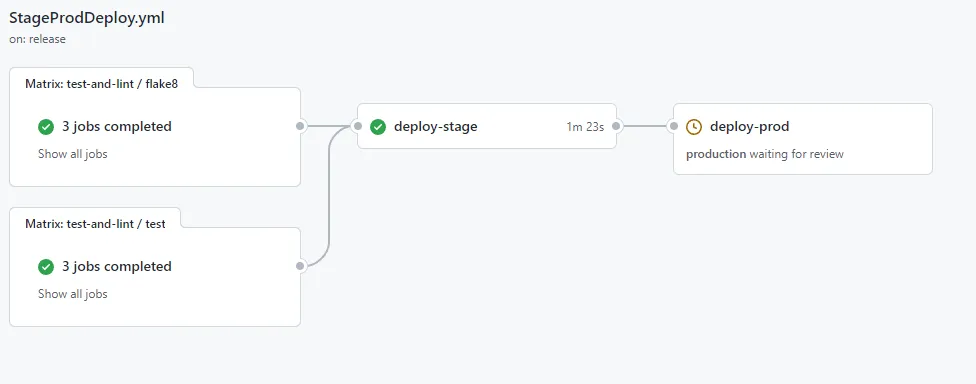
Stage is deployed successfully, let’s continue to production and approve the deployment.
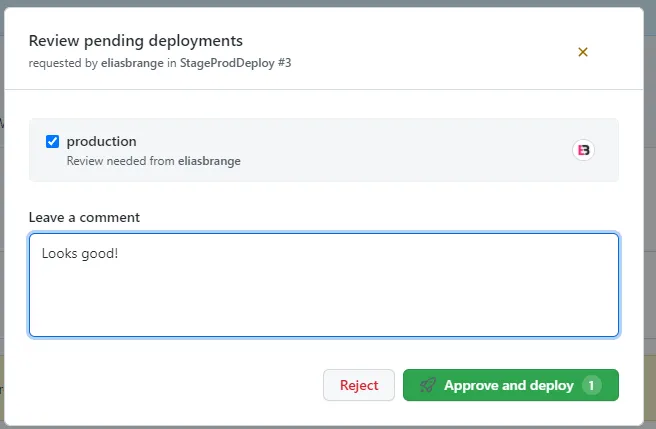
Deployment has been approved and the application will now be deployed to the production environment.
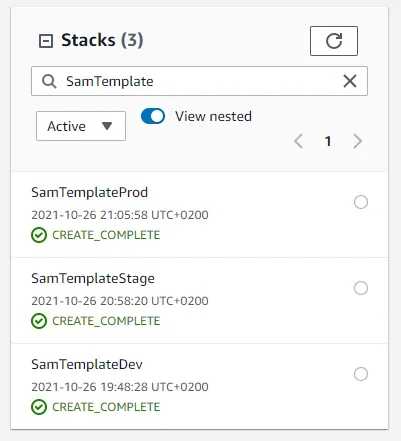
If you go to the CloudFormation console in each of your environment accounts you should now be able to find SamTemplateDev, SamTemplateStage and SamTemplateProd in their respective environments. When writing all this, I used a single AWS account so for me it looks like the following.
Conclusion
That’s it. You now know how to leverage GitHub actions to create a CI/CD pipeline that deploys your AWS SAM application to three different environments. If you are looking into using AWS CDK I have an AWS CDK template which is still in progress with a very similar setup as this one.
GitHub actions OIDC
GitHub recently announced that GitHub Actions now supports OpenID Connect (OIDC). This will allow deployments to be performed with short-lived tokens and can be leveraged to setup secure authentication between Cloud Providers and GitHub without needing to store long-lived credentials.
Hopefully the SAM CLI bootstrapping can take advantage of this in the future instead of creating IAM users.
Hopefully you have learned something new, I certainly did by setting all of this up. If you have any issues or feedback, feel free to open an issue on GitHub or let me know in some other way.
Take care!